

Overview
Your team can clock in and out of jobs and track expenses from anywhere, so you can prep payroll faster. The Jobber App is available on the Apple App Store and Google Play Store.
In the Jobber App, team members can track time throughout their day directly from the app. Time is recorded automatically as your clock in, work on visits, and move between jobs, helping ensure your timesheets are accurate without extra steps.
Time tracked in the app populates your timesheets in both the Jobber app and Jobber.com. These timesheets can be used to review how long was spent working, support payroll, and provide visibility into time spent on visits.
Jobber tracks time between:
- Time spent working on visits (this is labeled as visit time)
- Time spent working on assessments (this is labeled as assessments time)
- Time spent between appointments (this is labeled as general time)
As you start and complete visits, the app automatically records time in the correct place so you don’t need to manage multiple timers throughout the day.
On select plans, timers can also be started automatically based on location. Location timers in the Jobber app use geofences around a client’s property to start a visit reminder or remind you to track time when you arrive or leave, depending on your settings.
Time tracking availability
Time tracking is available on select plans.
View our current pricing plans.
Location timers are available on the Grow Plan.To check what plan you’re on, navigate to the Gear Icon, then select Account and Billing. If you have any questions about your plan’s features or pricing, our support team is here to help!
Jobber App Workshop: Run Jobs from Anywhere
Register for a free Jobber app workshop and learn how to run your workday from your phone.
In this session, you’ll learn how to run your workday from the Jobber mobile app including scheduling work, tracking time, managing visits, communicating with clients, and collecting payment on site.
The Jobber team will walk through the core mobile workflows that help reduce admin, keep your team organized, and make day-to-day work easier in the field.
By the end of the workshop, you’ll feel more confident using the Jobber app as your go-to tool for staying productive and getting more done from anywhere.
Timers and network connectivity
Timers work in all network conditions, including when you’re offline. Timer data is stored locally on your device and automatically syncs to Jobber Online once an internet connection is restored. Timer behavior stays the same offline as it does online. For example, a timer will stop or restart automatically when a visit timer is started or stopped.
Note: Geofenced timers (also called location timers) won’t work without an internet connection. Historical time entries and weekly hours totals also won’t load while you’re offline.
Start your day by clocking in
At the beginning of your workday, clock in from the home page of the Jobber app to start tracking time.
When you open the app, you’ll see a clock in button at the top of the home screen. Tap Clock In to begin your day. Once you’re clocked in, Jobber starts tracking your time automatically.
Clock in your crew: If you have permission to view and edit everyone’s time, you can clock in or out your entire crew at once instead of one at a time. Tap Clock In or Clock Out, then select your team members. Everyone selected gets their own time entry with the same start or stop time. This is available on Plus and Unlimited plans, requires an internet connection, and needs the Crew control setting turned on in Timesheets.
To view your team’s live timers:
- Select Timesheet from the main menu.
- Select the Time Log tab, then select the up icon next to the team member name to see everyone’s timers.
Crew clock-in doesn’t require Scheduling Crews.
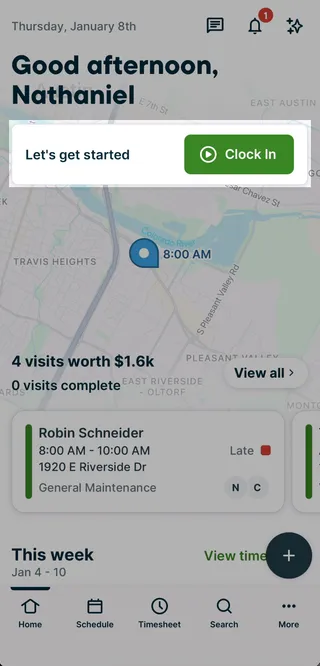
After you clock in:
- Your total time for the day begins running
- Time is tracked as general time until you start working on a visit.
- You can navigate anywhere in the app while time continues to run
As you move through your day the home screen updates to guide you to the next step, such as viewing your first visit or clocking out when your workday is finished.
Select View First Visit to jump to the first visit on your schedule for the day. Once you start a timer on the visit, the app automatically switches to tracking time for that visit rather than general time.
Start tracking time on appointments
When you’re ready to work on a visit or assessment, start tracking time directly from the visit in the Jobber App.
From the home screen, tap View First Visit or View Next Visit to open your schedule visit for the day.
On the appointment screen, tap Start Visit (on visits) or Start Time (on assessments) to begin tracking time on that appointment.
Start a visit for your crew: If you have permission to view and edit everyone’s time, on a Plus or Unlimited plan with the Crew control setting turned on in Timesheets, you can start or stop a visit timer for your entire crew instead of one at a time. Tap Start Visit or Stop Visit, then select from the team members assigned to that visit. You can select some team members and leave others running.
To view your team’s live timers:
- Select Timesheet from the main menu.
- Select the Time Log tab, then select the up icon next to the team member name to see everyone’s timers.
Crew clock-in doesn’t require Scheduling Crews.
Note: You can only start an assessment timer on the current date. Previously tracked assessment time can be viewed in Timesheets but cannot be edited from the app.
When you start a timer:
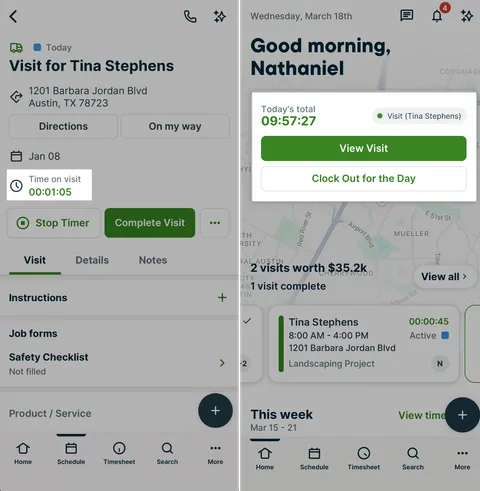
- Time is automatically recorded for that appointment. The time on appointment is shown on the timer button, on the timesheet tab time log, as well as on home.
- Your total time for the day continues to run
- The app switches from tracking general time to visit or assessement time
- Time will continue to track on this appointment until the visit is completed or the timer is stopped
You can continue to use the app while a visit or assessment timer is running. Whether you return to the home screen or stay on the appointment, you’ll always see the current timer and your total tracked time for the day.
Note
You can complete a visit or assessment without stopping your timer first. If your timer is still running after the appointment is completed, tap Stop timer to end it. You can also tap View from the Home screen to open the appointment and stop the timer there.
If you need to continue tracking time after completing the visit (for example, while creating an invoice), tap View Visit to start the visit timer again from the visit. Any additional time will continue to be recorded against the visit.
Once you are done with all work related to an appointment, complete the visit or assessment.
If you already had the general timer running, it will start again now that the appointment timer has stopped.
Once a visit is marked complete, you won’t be able to start a timer on that visit again unless the visit is re-opened. From the visit, tap the Reopen Visit button, then tap Start Time to start the visit timer.
Live Activities and Live Updates for timers
When you start a timer in the Jobber app, you can see the running time outside the app without opening it back up. This is called Live Activities on iOS and Live Updates on Android.
On iPhone (Live Activities)
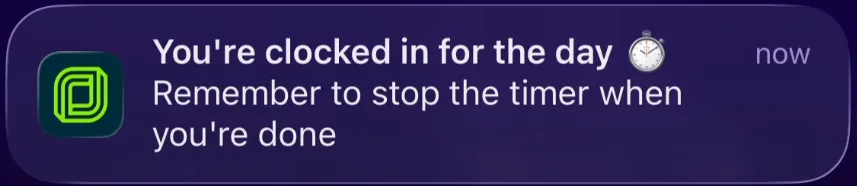
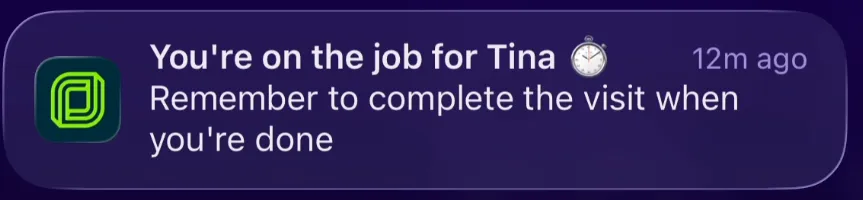
Your iPhone can show the running time on your lock screen and in the Dynamic Island. The Dynamic Island is the small interactive area at the top of the screen on iPhone 14 Pro and newer models — on older iPhones, the running timer appears on the lock screen instead. If you have an Apple Watch or CarPlay connected, the timer shows there as well.
To set up Live Activities for timers:
- In the Jobber app, go to More, then select Preferences.
- Under Push notifications, turn on Active timer.
- Start a timer. Your iPhone will ask: Allow Live Activities from Jobber? Tap Allow.
If you tapped Don’t Allow by mistake, you can enable it later in your iPhone settings. See Apple’s guide to Live Activities and the Dynamic Island for help.
On Android (Live Updates)
Live Updates is a feature of Android 16 and newer. Availability depends on your device’s Android version, and where the setting lives can vary by device and manufacturer. If you’re on a supported version of Android, check your device’s notification settings for the Jobber app for an option related to live or ongoing updates.
View visit timers on the list view of the schedule
If you have an active timer running on a visit, the elapsed time will show in the list view so you can see quickly how long you’ve spent on a visit as well as what is next in your day.
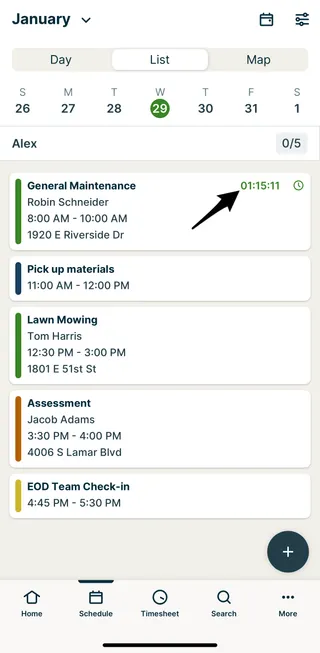
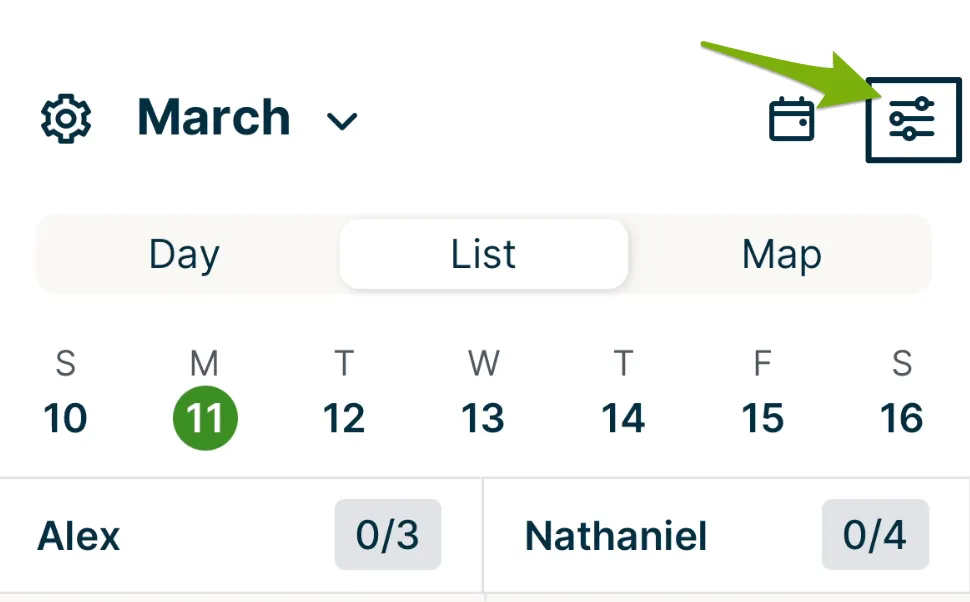
To navigate to the list view, tap the View options icon.
Then select List from the view option.
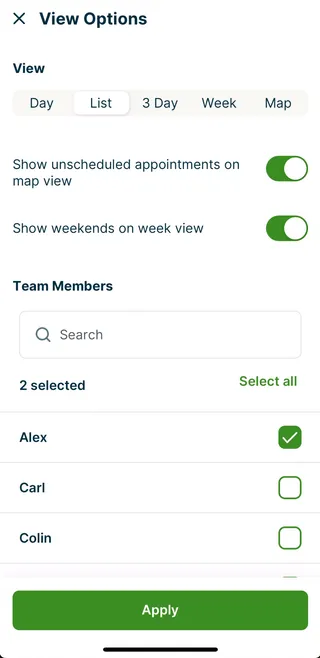
Note: Timers must be started in the app and currently be running to appear in list view.
Learn more about the schedule in the Jobber App.
Timesheet tab
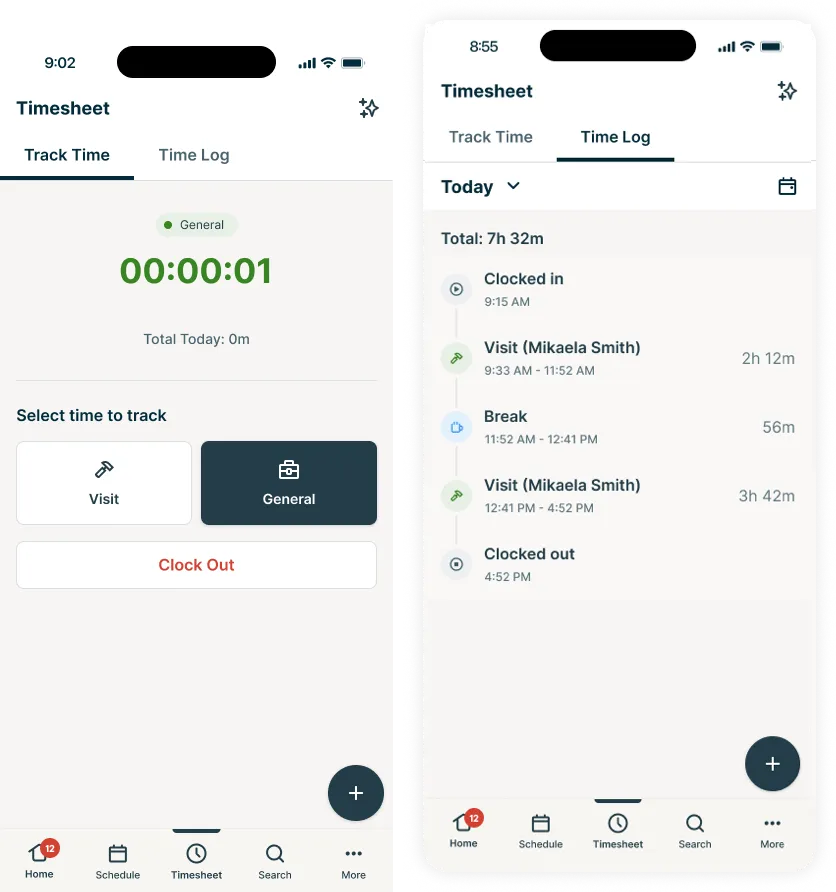
The Timesheet tab in the app’s bottom menu is where you track and review time throughout your workday. It has two tabs: Track Time and Time Log.
Track time
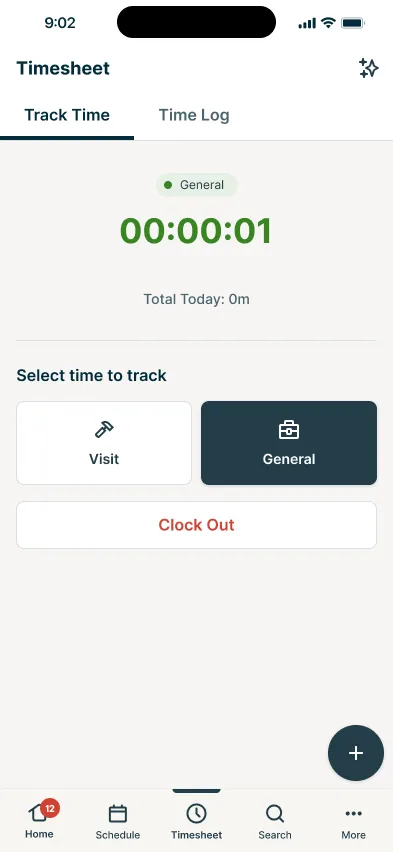
The Track Time tab is the default view when you open Timesheet. It shows a running timer for your current activity, your total time tracked for the day, and action buttons to start time against different activity types.
Tap an activity button to start tracking time for that type of work. To start time on a specific visit, tap Visit. A list of visits scheduled for the current day appears — select the visit you’re working on to begin tracking time against it.
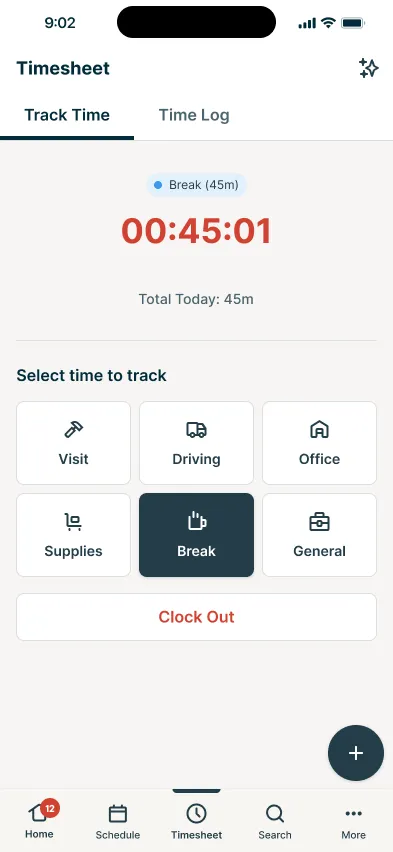
Note: On Plus plans, additional activity labels are available: Driving, Office, Supplies, and Break. These labels give you a more detailed breakdown of how time is spent across your workday. Learn more about Track Time Categories and Breaks.
Timelog
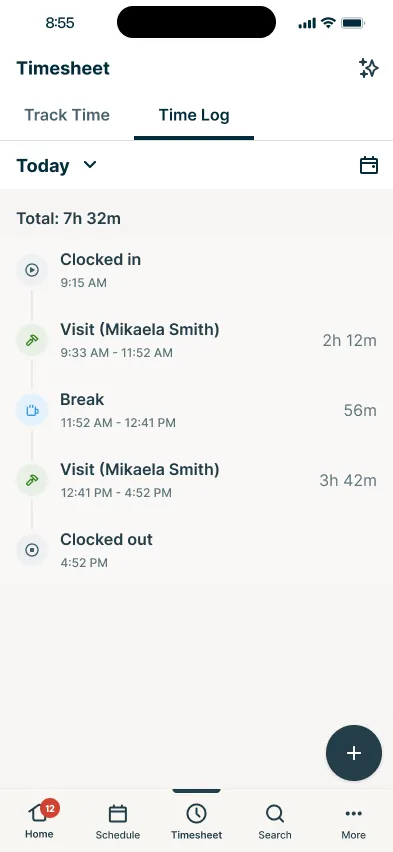
The Time Log tab shows a chronological record of all time tracked for the selected date. Use it to review the activities and durations logged throughout your day.
From the Time Log tab:
- Tap the date dropdown at the top to navigate to a different day, or tap the calendar icon to select a specific date.
- The total time tracked for the selected period appears below the date selector.
- Each entry shows the activity type, start and end times, and total duration.
Entries appear in chronological order, connected by a timeline that shows how your workday progressed from one activity to the next.
Note: By default, you can view and edit only your own time entries from the app. If you have the “View, Record, and Edit Everyone’s” permission, you can also view and edit your team’s time entries. You can add a time entry for any day. See Add a timesheet entry below. You can view previously logged time from any date.
Add a timesheet entry
You can manually add a timesheet entry from the Jobber app without starting a timer, using the quick create menu. What you can add depends on your time tracking permission:
- If you can record your own time, you can start and stop timers, but you can’t manually add entries.
- If you can edit your own time, you can manually add entries for yourself.
- If you can edit everyone’s time, you can manually add entries for any team member.
To add a timesheet entry from the Jobber app:
- Tap the quick create menu in the bottom right (+), then select Time Entry.
- On the Create time entry screen, select the Team member the entry is for (only visible if you have permission to manage everyone’s timesheets), the Date, and the Start time and End time.
- Select a category: Visit, Driving, Warehouse, Supplies, Break, General, or Admin.
- If you select Visit, choose the specific visit or assessment from the list. This list shows every visit and assessment scheduled for the selected date, or only the ones assigned to you if you don’t have permission to view everyone’s schedule.
- Add a Note if needed.
- Tap Save Time Entry. The entry appears on that team member’s timesheet for the selected date.
Edit a timesheet entry
- Sign in to the Jobber app.
- Navigate to the Timesheet tab, then tap Time Log.
- Tap the time entry you want to edit. For example, tap General to edit a general timer.
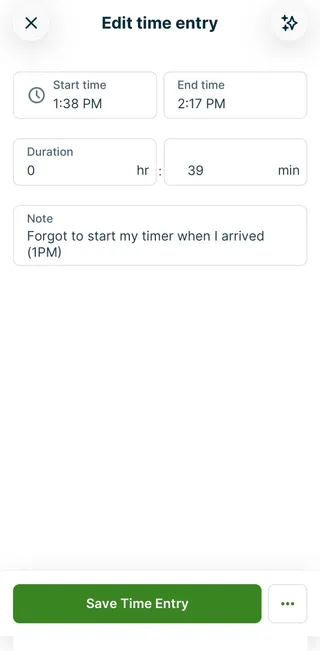

- On the Edit time entry screen, update the start time, end time, duration, or notes.
- Tap Save Time Entry.
Add a timesheet note
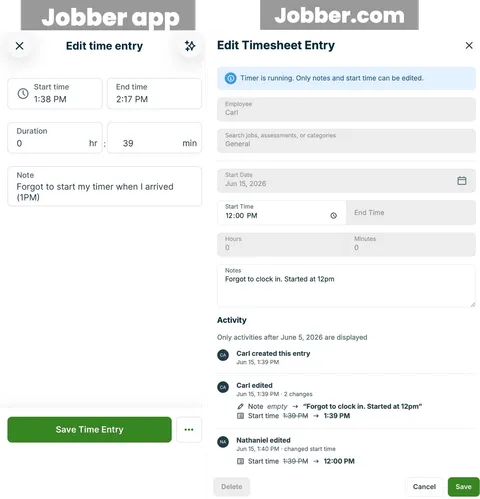
Notes on time entries give your team a place to add detail about a specific time entry. Notes can be added from the Edit time entry screen. Notes cannot be added while a timer is running.
Notes appear in both the Time Log tab in the app and on the Timesheet page in Jobber.com. If timesheets are edited, the the edit history will be visible from Jobber.com.
To add a timesheet note from the Jobber app
- Sign in to the Jobber app.
- Navigate to the Timesheet tab, then tap Time Log.
- Tap the time entry you want to add a note to. For example, tap General to edit a general timer.
- On the Edit time entry screen, enter your note in the note field.
- Tap Save Time Entry.
Delete a timesheet entry
To delete a timesheet entry from the Jobber app:
- Navigate to the Timesheet tab, then tap Time Log.
- Locate the entry you want to remove and tap Edit.
- Tap the … button, then select Delete.
- Tap Delete to confirm.
Overnight timers
Time entries are associated with the date the timer was started. This means that if you ever forget to stop a timer or if you work nights, once the clock strikes midnight it may become “stuck” when you try to stop the timer from the app since the time is associated with a new date. In this case, since only one timer can run at once, you’ll need to stop the running timer before being able to clock in or start a new timer.
If you are having difficulties with stopping the running timer, the easiest way to troubleshoot this is to view the user’s Timesheets from jobber.com. From their timesheets, locate the date with the running time and select Stop timer. If the timer was left running by accident, you may then need to edit the time entry. Once the timer has been stopped, the user will be able to clock in from the app again.
Learn more about Timesheets in Jobber.